 The digital technologies enable enterprises to automate various business processes and operations. But the technological needs differ from one enterprise to another. Based on the technological and business requirements, programmers nowadays have to write a variety of custom software products – desktop applications, web applications and mobile apps. Each type of application is built to meet specific business needs and based on predefined business requirements. Continue reading Software Product Development Best Practices
Tag Archives: Best Practices
The whole is greater than the sum of its parts
This truism is applicable to all, whether it is an individual or a company. The various facets which confluence to make an entity great render to it a unique flavor, one that cannot be copied completely. The innovative practices at Mindfire Solutions contribute towards its uniqueness and differentiate it from its peers in the software industry. Here’s how.
My last blog was on the 2 minute innovation where I told you how Mindfire Solutions follows a unique project status communication practice which makes use of rich media to communicate the day’s progress to the client. In this blog you will get to know yet another innovative best practice followed at Mindfire Solutions. Ever heard of the term collective intelligence? No? Well, simply put, it means 2 is better than 1. Only, in our case 700 is better than 1. This is an approach aimed at solving individual queries by the combined knowledge of an organization.
We all know that the true value of an organization can be closely gauged from what lies between their employees’ ears. And Mindfire Solutions not only encourages its employees to broaden their horizons but also gives them the scope to make the best use of it by fostering a culture of sharing. As time passed, number of projects increased and Mindfire’s numbers and ranks swelled, realization dawned that although the collective knowledge of the organization was increasing linearly the individual knowledge was more or less limited to his own area of expertise. Owing to a demanding work scenario and paucity of time there was hardly any scope to learn more at an individual level. In an organization where knowledge is treated as the most important asset, productivity would get a quantum boost if there was some way in which the information about the knowledge and skills of an individual can be shared with another individual in need.
And then a unique knowledge management practice was developed in Mindfire Labs and christened as Fluid Expertise. Based on his need, a Mindfirean can use this system to search on the particular topic and then get the content results as well as the list of colleagues who can help. The database for this project consists of the user profiles of all the employees (which include their expertise, blog links, seminars conducted, articles, projects, team space etc.) as well as the articles, tips, case studies etc. contributed by them and available on the website. The search results will be displayed to the user in his browser in a 2 part sectioned format. While the upper half contains the people search results (in this case Mindfire’s in-house subject matter experts), the lower half contains the results from a Google customized search. The user can then choose to proceed according to his wish, i.e. contact the expert on a communication window or click on the pages as suggested by Google.
How the system works?
The system either crawls through the website or parses text/html, word documents and PDFs and considers the content for further processing. Again in order to match the query against the document the text in the document is indexed. The match can be done against the URL, title or the description/content of the page and when the user clicks on the URL the content will be displayed. As is expected, a lot of inputs are required to find out the top ten subject matter experts on a particular topic. And because we have too many inputs it becomes imperative to decide which among these inputs are primary and which ones are secondary. The primary inputs help in choosing the top 10 people and thereafter, the primary and secondary inputs both are used to rank them. The secondary inputs don’t have a role to play until the top helpful persons have been selected. The decision as to what could constitute the primary and secondary factors are left to the system owner’s discretion.
Following are some of the factors that contribute greatly in people search listing:
1. Content:
Content has to be the most important factor to judge the level of an individual’s expertise. With the help of an open source indexing engine and a compatible server which helps add easy interfaces to add/update/query documents and pump more data, an expert’s contribution is closely gauged in his area of expertise.
2. Number of User clicks:
For a specific search the system will track which links has been clicked by which user and which expert has been contacted by which user. This knowledge will be useful for predicting the result for the user thereby providing personalized search experience.
3. Peer Endorsement:
In this case the system will take time to learn from user input and suggest right people and direct the user to the expert. To address this, there will be an offline input mechanism where employees should be able to specify who is an expert in which area. This will also form a part of the database.
4. User Feedback:
While designing the system we realized that there should be an offline data collection mechanism to know whether contacting a person helped, in short a feedback is sought. Initially the system gives a default people rank to everybody. After collecting inputs from various users the people rank increases or decreases accordingly.
5. Interconnections:
This factor varies from person to person. As the name suggests, these variables play a role to decide how easy it is for A to connect with B. This is determined based on the fact whether the 2 users belong to same team, same project, same center, same team space etc.
6. Previous search:
To get this data the system should be able to store old searches by users and match the current search against old search and find relevant experts to solve the query.
In order to get near accurate rankings of the resident experts at Mindfire Solutions these parameters are constantly monitored and at times subjected to minor changes to give an appropriate listing. And in this way we make use of information readily available to not only solve client issues but also increase our knowledge base on a particular topic by learning it from the guru himself.
These systems and processes at Mindfire Solutions make it robust inside out. And when a customer engages with Mindfire Solutions, although he would interact with a small team, he would definitely feel the depth of knowledge in his work which is largely due to the collective intelligence behind it. That is what contributes to making Mindfire Solutions an enviable organization to work with and work for. Who wouldn’t?

The 2 Minute Innovation
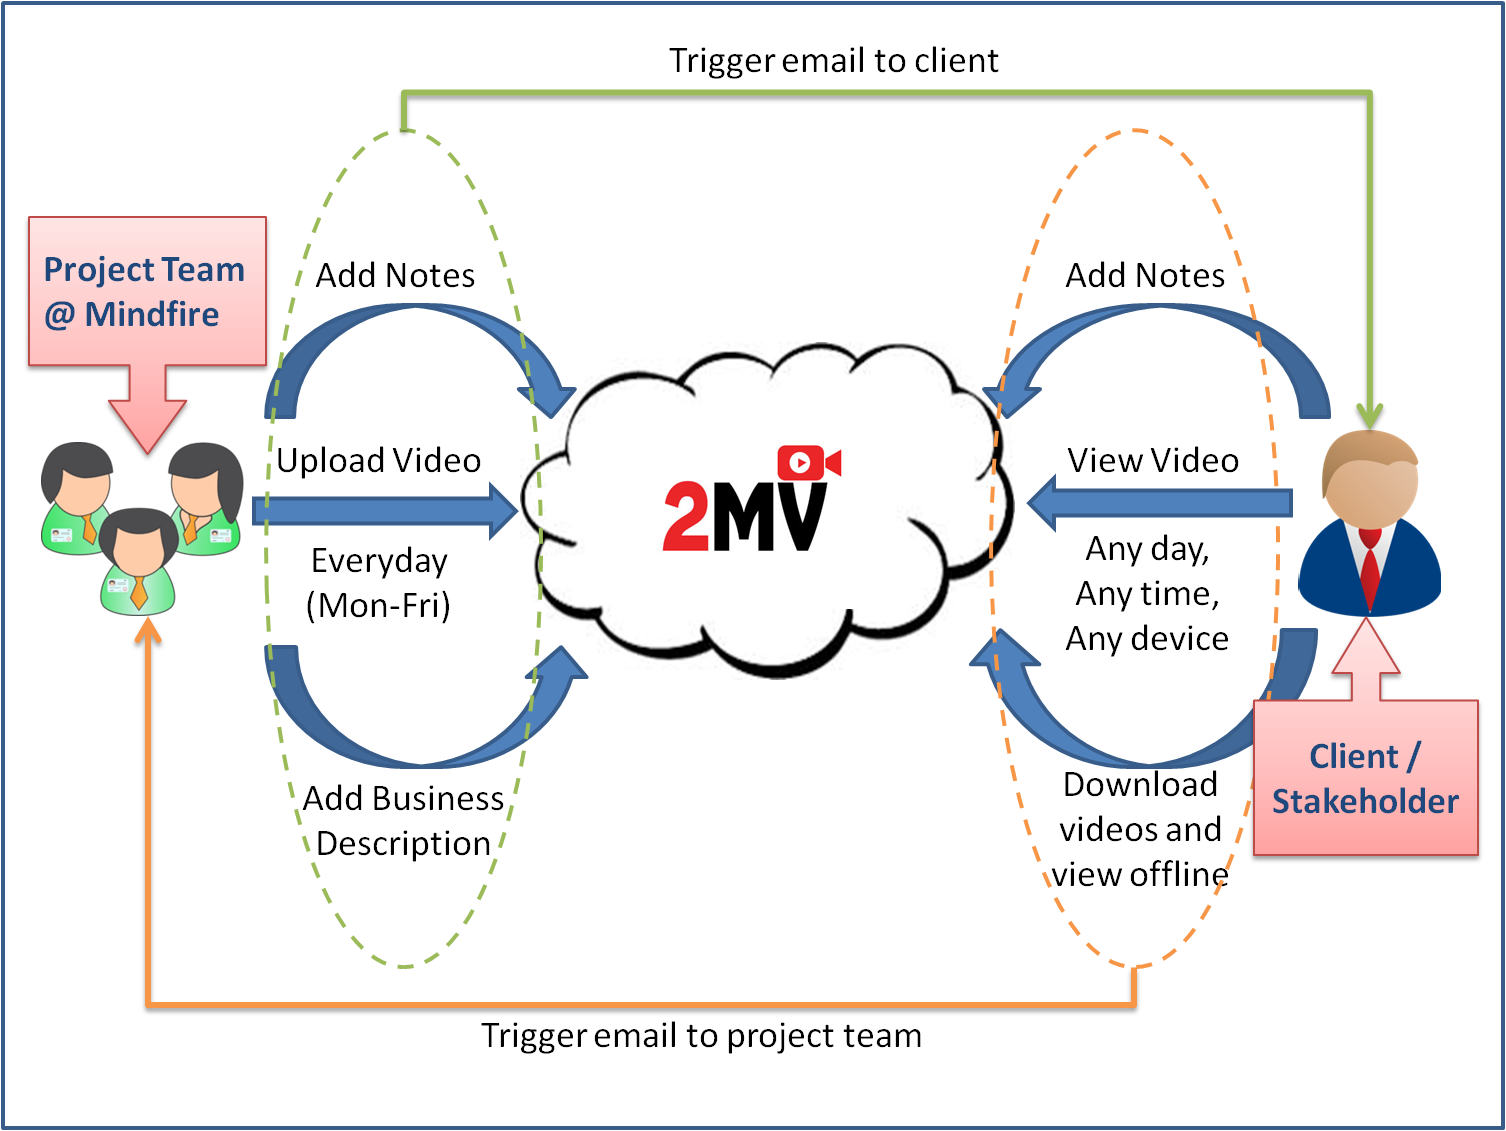
And before you come to a seemingly easy conclusion, let me be very clear. I am definitely not talking about Nestle’s Maggi noodles which can be cooked in about just two minutes. So what could be the 2 minute innovation? Ever heard of 2MV (short for 2 minute video) as a daily reporting tool? Possibly NO! Allow me then to introduce you to the 2MV Habit that is religiously followed at Mindfire Solutions.
About the 2 Minute Innovation 2MV:
The 2MV Habit is a unique practice followed at Mindfire Solutions. This was exclusively designed to address problems that are typical to outsourcing/off-shoring/remote software development companies. The common problems pestering this industry are:
- lack of visibility in true daily work progress,
- absence of the human factor,
- lack of synchronous communication owing to different time zones and
- unavailability of rich communication possibilities (email and documents have their own limitations)
We call it the 2MV Habit because it is a daily practice wherein the developer records his daily progress in the form of 2 minute long videos that are actually screen-casts (videos of the screen) with the audio commentary by the developer. This could also include a little bit of code browsing as well.
So how does it differ from emails/documents?
The use of video/media differentiates 2MV from an email/document by creating software engineering artifacts that are rich in information. After some initial hiccups the developer realizes that while he can make a 2MV in 2 minutes, he would take around 5 minutes to draft an email/document. However, on the flip side, while the contents of an email/document can be scanned in a minimum 10 seconds time, it would actually take 2 minutes to go through a 2MV.
How the 2MV works?
Clients can log in to Mindfire Solutions’ cloud based project management system with the credentials that are provided to them at the time of on-boarding. Successful login takes the client to the 2MV home page wherein all recent activity is listed as a stream of events. One can then view the 2MVs by clicking on the 2MV icon which renders a flash / HTML5 player and plays the video on the homepage. Comments can be made from the event stream itself. There are also options in the account menu to change the email preferences on new 2MV upload, note addition, transcription addition and resetting of password etc.
Benefits of using the 2MV Habit:
- Giving demos daily helps the developer to view the work from the user’s perspective
- The developers feels accountable to produce demonstrable work every day
- The human voice renders a personal touch and helps forge better relationships in a remote team environment
- It also helps the developers bond better with the software QA testing professionals bringing in better coordination between teams
- Easier, faster and better daily status reporting
- Instills a sense of ownership in the developer as the 2MV carries their personal signature
- Rich knowledge base with visible gradual evolution of software and codebase
- Any misunderstanding with respect to requirements or specs is detected at an early stage and fixed accordingly
- Easier, faster and better transition to new team members whether in case of attrition or scaling up the existing team
- Better insulation from human risks in team
A 2MV experience:
Let’s be honest. Everyone was not really enthusiastic when the 2MV was launched. As with just about anything that is new, there was some resistance to 2MV initially from one of the project teams. This was mainly because they were not comfortable recording the video (Ironically, they assumed it would take them more than 20 minutes to record a 2MV). Also they wanted to hang on to the traditional methods of email and online meetings with the client as they believed that they could email faster than record the day’s work in 2 minutes. Before panning it completely, they were coaxed to give it a try, one last time. And then the rest is history. The client loved this mode of communication and decided to use this method instead of emails and meetings. This helped them cut down time spent on meetings. Finding a time suitable for both the development team and the client was again a hindrance, but the 2MV helped get rid of it. The developer could record his day’s work before he left and the client could review it whenever/wherever he wanted to using any device (desktop/laptop/handheld). In this particular case (and as with most other cases), the client not only applauded Mindfire’s effort but also gave valuable feedback that we incorporated subsequently.
For a company that is ONLY into offshore small team software development, Mindfire Solutions offers its clients this unique status reporting tool that not only adds a personal touch but is also a rich repository of evolving project information. One of our clients commented that:
“We’d just like to say what a great idea the 2 minute video is in maintaining a good relationship between us and Mindfire. It is often difficult to build a personable relationship over such a distance but we feel this definitely helps! Seeing the developer’s computer screen brings things closer and enhances trust and support.”
Yet another client found 2MV to be an interesting concept and was of the opinion that:
“A 2-min video is best for more general info and UI demonstration.”
As for our developers, most of them appreciate Mindfire Solutions for this initiative as it has helped them better their communication skills. The fact that the client can add comment in the 2MV itself makes the communication very clear and less time consuming. One of them said, “I have also spotted some issues in my code while making the 2 MV at the EOD. So, it’s like testing the whole thing you have worked on before you leave for the day :)”
And when I asked another developer how the 2MV is a mutually beneficial initiative he said,
“It helps to make changes on the work from the beginning as client provides feedback on the work from the scratch level where as in text emails client sends changes/fixes only after seeing the complete task on stage and its sometime difficult for the client to visualize the work from text and provide feedback. Also it helps the client in decision making whether or not to continue/pause the current functionality and jump to some urgent fixes.”
As 2MV is increasingly becoming popular as a project status reporting tool, it would not come as a big surprise if clients begin to choose this as a preferred mode of communication over email and Skype. We surely live in interesting times!
(N.B. : Mindfire follows small team software development very seriously and there are many such practices at Mindfire Solutions. Watch this space for more innovative techniques/processes practiced at Mindfire Solution. We use technology to be efficient!)
It isn’t Hard to Hard-code!
Recently I came across an interesting programming situation.
Parts of a web-based system stopped working suddenly, with nothing significant having changed. After some finger-pointing and accusatory guessing, it was discovered that some scripts on server side had been shifted from /root/1level to a deeper nested folder, let’s say /root/1level/2level. So far so good.
What happened next? Why would that make a system stop working?
Code needed to find path for some processing. The code split on first backslash to find file name, implicitly assuming that the file would always be one-level deep from root. When the file was shifted into a deeper folder, the path extraction stopped working.
There can be arguments about whether the admin should have shifted files into a deeper folder without informing developer, or why this should not have been done at all, and so on. But I consider this a clear elementary programming mistake of the hard-coding variety.
Hard-coding does not mean just typing in numeric or string literals into code, although that is the obvious college-level hard-coding. X = 420 or sEndDate = “1/1/2022”. It also means any type of inflexibility embedded right into the code and program. Hard-coding means not understanding the need for flexibility and not writing elegant code that can adapt to its surroundings.
Hard-coding is called “hard” coding because anything hard cannot be molded to suit the need at hand, because it is inflexible. Like when you put in an assumption that your file is one-level deep,, which makes it inflexible to run when its level changes.
What would be the right way to deal with this?
Step 1: extract path in a loop, so that you can handle any level of folder-nesting. You don’t assume you are N levels deep, because folder-level is not something that can be assumed! Instead you traverse the path to find how deep you are.
Step 2: Back-slash? Welcome to multiple OSs! The file-separator character itself is hard-coding. In every language worth its salt that runs on multiple OSs, you have operators to find environment variables including file-path separators. On Unix/Linux you are “/”, on Windows you are “\” or “/”. On Mac you had “:” long back during MacOS, and now you have “/” on OS X with its Unix core. And then I was on some Solaris/RISC machines decades back which used “.”.
Should you hard-code assumptions about N-level nesting and separators? Absolutely not.
Does it need extra time to write flexible code? Absolutely not. The amount of time you spend later in not writing tight right code in the first place, so much of debugging and frustration and rework – it would all be avoided if it were first-time right. And to write above path-extraction code in a loop with separator detection rather than hard-coding – you are talking about couple extra minutes. Take one less leak and you can find time to do the right thing!
Is it rocket science that an average programmer cannot do? Absolutely not. Once you decide to do things like this, it is pretty easy actually.
Then why do people not do it?
Because of mediocrity. A mediocre mind is happy with sub-standard work that somehow passes through. Because of lack of involvement. When you are pushed into a “career”, you are least concerned with your quality of work. As long as the next raise comes around, who cares! You are not a craftsperson to take pride in work, you are just a code jockey.
This, ladies and gentlemen, is the difference between a good software engineer and someone who just gets things to work. A good software engineer anticipates need for change and does things first-time right. A good software engineer thinks ahead and does things in flow during first-code which take very little additional time to do. A good software engineer does not hard-code, either directly as literals or indirectly as implicit assumptions.
Someone who is just a programmer does not do any of the above, and just somehow gets things to work – never sure when it will fall apart.
Now you decide what you want to do.

Beginner’s Guide To LESS CSS Framework
LESS CSS framework is intended to make/design adaptive websites. The framework extends the use of CSS with dynamic behavior such as variables, mixins, operations, nestings and functions.
Generally LESS runs on both the server-side (with Node.js and Rhino) or client-side (modern browsers only).
Using this guide you can move in the right direction in starting up with the LESS CSS and eventually develop your own websites using it.
WHY LESS CSS?
The day we have started using CSS for enhancing the look and feel of our HTML websites, we found it quite interesting and in a gradual process, it has changed the way our websites appear.
Day-by-day CSS was used all across the world wide web, starting from static website development, till UI as well as web application development. Looking into the global use of CSS across the web, all UI persons and web designers started using it in every project without looking towards the limitations of it.
A significant amount of design time with CSS is spent rewriting common code for routine operations and maintenance works for a site in the form of color change, font change and such like. Of course, all this routine code can quickly become disorganized in traditional CSS designs.
Problem occurs on the cases, where we we have thousands of lines of styles and some separated CSS files to maintain. What is needed is a framework for CSS that will work in the same way like the other dynamic pre-processors(PHP) do during the web development.
LESS CSS Framework has been around for a while and does exactly that. LESS extends CSS with dynamic behavior in association with variables, mixins, operations and functions in support of common tasks that includes the facility for organizing code in folders and files. As a result, time spent writing and organizing CSS code becomes greatly reduced. In general, being a LESS framework user, I must say that the use of LESS has made my CSS coding look more clean compared to the traditional use of CSS.
My favorite feature in the LESS CSS is the ability to use the variables in the form of define something once, assign a value to it and refer to it later throughout the CSS script. This feature works the same way I use PHP variables.
What Editor shall I use to write LESS CSS?
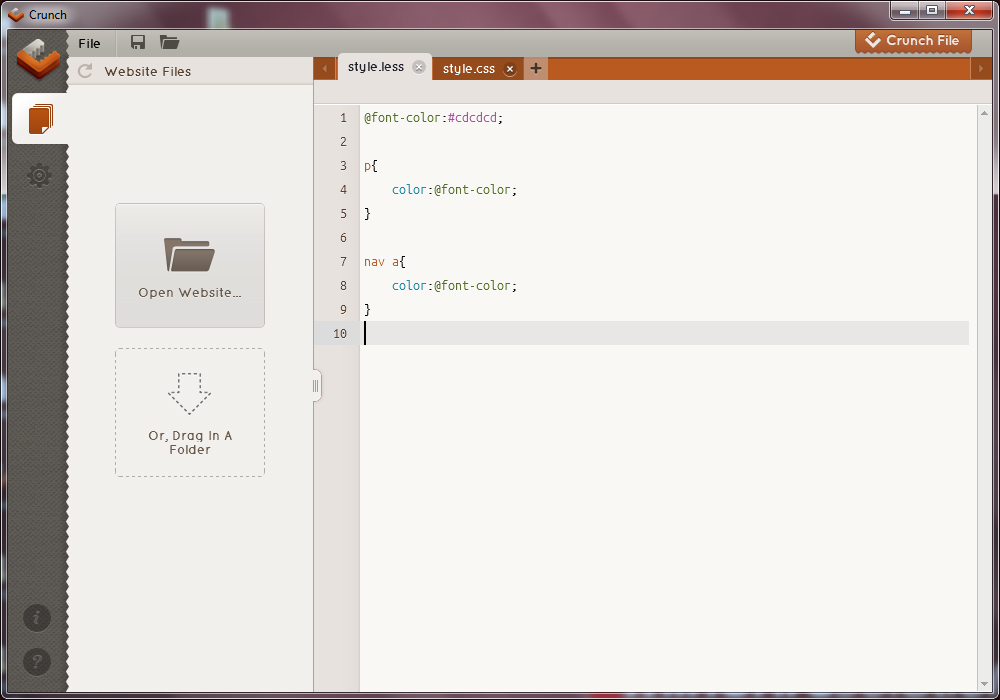
There are several editors available widely for LESS CSS code writing. But the editor that most of the CSS coders are using across the world and the editor that specifically meant to support LESS file editing, is the ChrunchApp. CrunchApp is a cross-platform application, built on Adobe Air, which can be run on any environment, whether it may be on Windows, Mac OS X or Linux.
So, what we are waiting for? Let’s download the CrunchApp. Install it and start writing our first LESS CSS.
How to use LESS
As we have already discussed that, LESS is used both in server-side as well as Client-side. Among the both ways of LESS framework uses, Client-side is the easiest way to get started and good for developing websites using this LESS CSS.
To start coding using the LESS framework, we need few lines of code inside the <head></head> tags of our HTML document. First, the .less framework file on which we will write all our css scripts and next to that, the less.js library, which helps in rendering the .css file out of the .less file.
Using LESS is really easy. We only need this two lines inside the head tag of your HTML document.
<link rel=”stylesheet/less” type=”text/css” href=”less/style.less”>
<script src=”js/less.js” type=”text/javascript”></script>
Now, let’s see how to write code using the Crunch LESS compiler and compile the .less file into a fully functional .css file.
First of all, let’s open the CRUNCH compiler application.
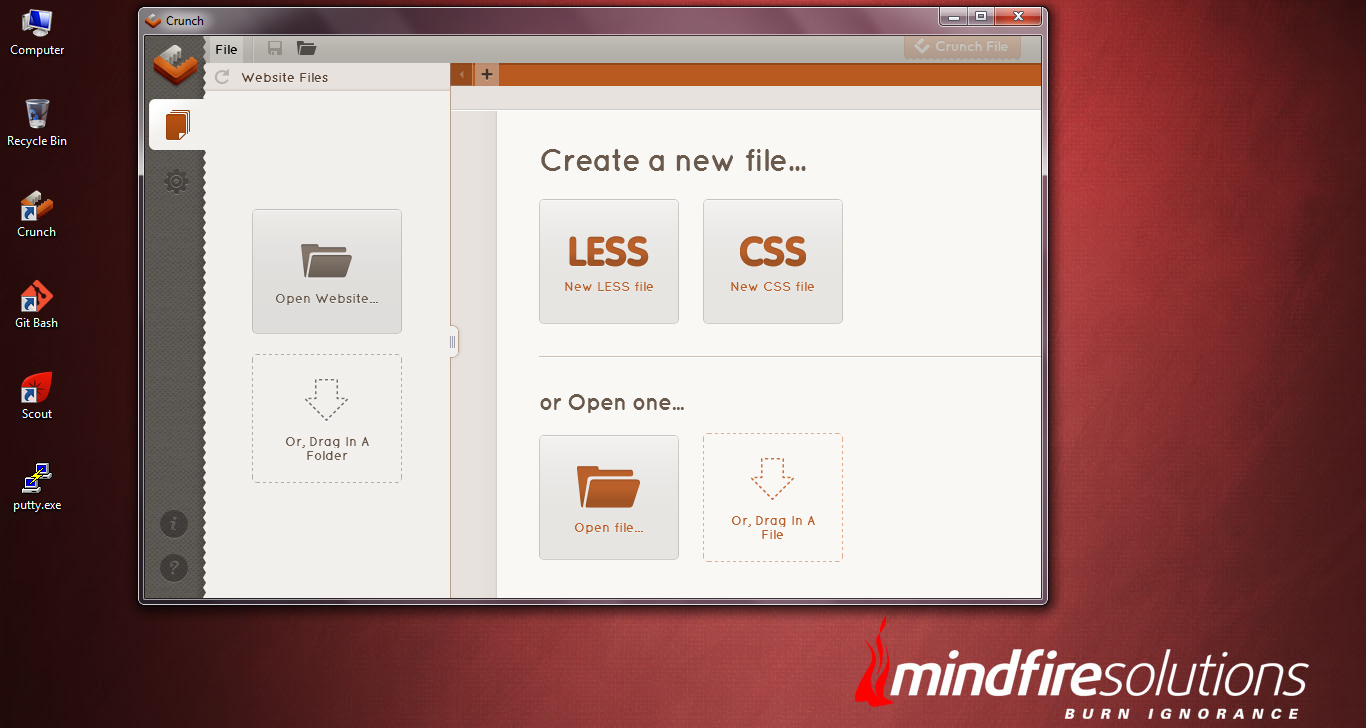
Crunch LESS compiler is a quite easy to use. The whole application base is quite user friendly and visually appealing without giving the feel of getting cluttered. Genuinely you will feel fun to use this application.
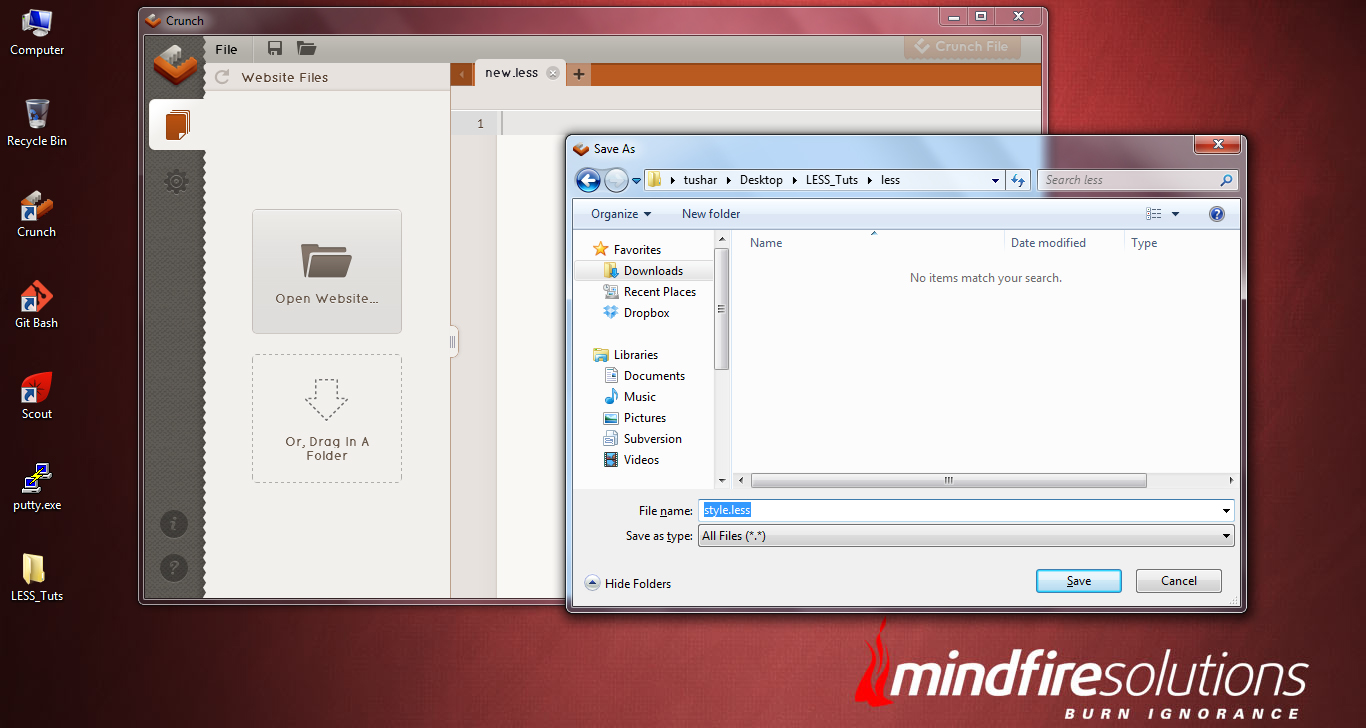
Now click on “Create a New LESS file” button. This will prompt to save your newly created .less file within a directory. Give it a name (I have given style.less) and save it within the directory named as “less”.
NOTE: Before creating a .less file, make sure you have created your projects directory within your computer and created two sub-directories (css directory) and (less directory) within it.
Now you can see your style.less file being opened in the Crunch Editor. Click the “+” icon next to the file name “style.less” in the editor. This will create a new .less file. But this time, save this file with the name of style.css within the “css” directory we have created previously.
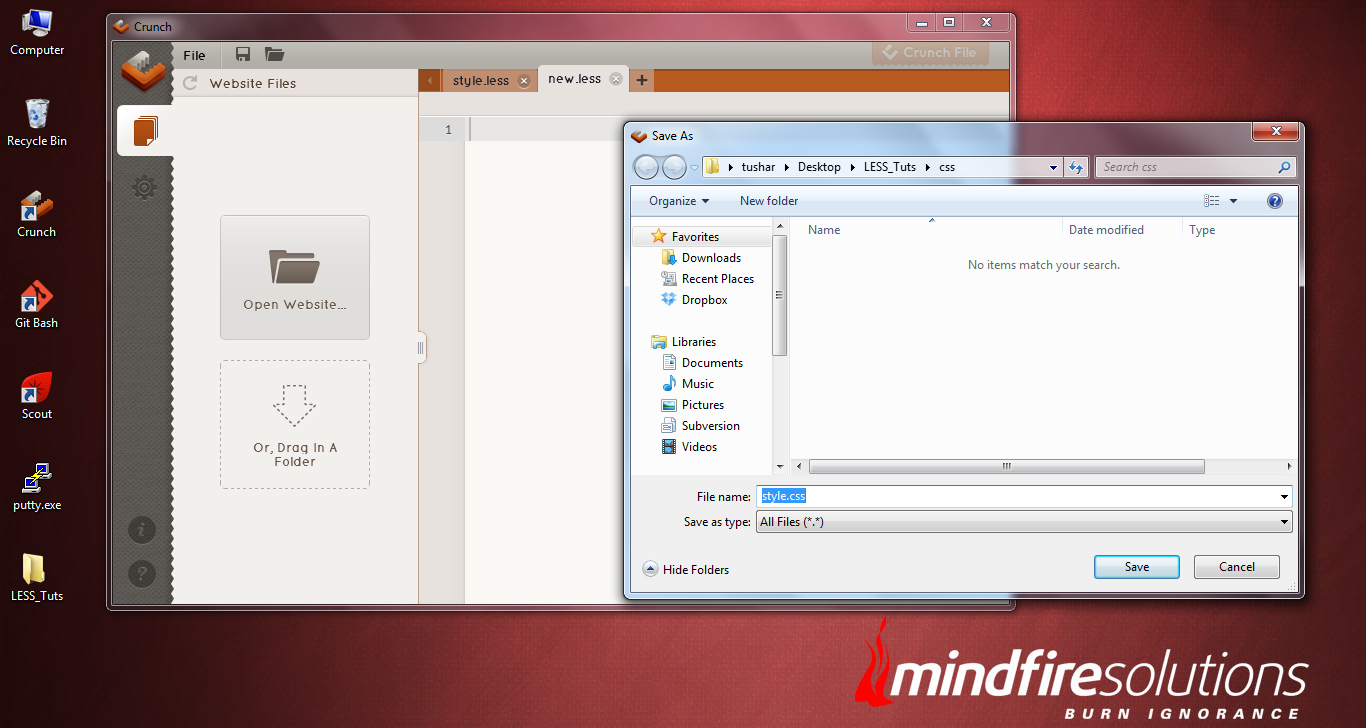
Now you can find, two files opened in the Crunch editor (style.less and style.css). Among these two, we have no use on the style.css file, as our main purpose is to write LESS css scripts and which will be compiled to .css scripts and be saved in the style.css file.
As of now, we are all set with the creation of files and directories. Now, it’s time to create a simple html layout, based on what we will write some basic LESS CSS scripts to see our progress on the scripting.
Now, our only need is to link the CSS file into our HTML document, as follows;
<link rel=”stylesheet” type=”text/css” href=”css/style.css”>
Let’s see, how to integrate the .less file and the LESS JS library into a basic HTML script.
<!DOCTYPE html>
<html>
<head>
<title>LESS Framework Tutorial</title>
<meta name=”viewport” content=”width=device-width, initial-scale=1.0″>
<link rel=”stylesheet/less” type=”text/css” href=”less/style.less”>
<script src=”js/less.js” type=”text/javascript”></script>
</head>
<body>
<div id=”container”>
<div class=”shape1″ id=”shape1″></div>
<div class=”shape2″ id=”shape2″></div>
<div class=”shape3″ id=”shape3″></div>
</div>
</body>
</html>
As you can see from the above HTML layout, we have integrated the two lines of codes (the css file and the less js library) inside the <head> part of our HTML. Make sure the .less file is integrated before the less.js file within the head.
Along with the above coding, we are all setup with the LESS CSS framework to work on out basic HTML template.
The next thing we will discuss is, some basic syntax that are mostly used during LESS CSS editing.
Before learing the basic use of LESS, let me remind you that, being an extension to CSS, LESS is not considered to be backwards compatibility of the traditional CSS, but the truth is, it adds the same use existing CSS syntax in a different and modern way. This makes the CSS coders learning LESS to be quite interesting and fun too.
Unlike our regular CSS coding, LESS works in a similar way and more-or-less like a programming language. But it’s dynamic feature has made it interesting and dynamic too. So, we must expect to find certain terminologies like Variables, Operation and Scope along the way unlike we use them in our other programming / server-side languages.
VARIABLES in LESS
In the traditional CSS that we are presently using, cases we came across where probably we write something like this, where we use repetitive values assigned to some properties to some id/classes in the entire style-sheet.
.shape1 {
color: #5cb100;
border: 1px solid #5cb100;
}
.shape2 {
background: #fff;
color: #5cb100;
}
.shape3 {
border: 1px solid #5cb100;
}
Writing this piece of code in our stylesheet is quite similar in most of the cases for the web designers and using this kind of css is also perfect to go with. But the problem arises, when our client want us to replace the color #2d5e8b across the site. Things became so tedious when we start modifying the stylesheet.
But things can be solved by using a CSS pre-processor, that can easily replace the traditional methodology of defining the styles. We can use a variable to store a constant value for it and use it later throughout the stylesheet.
@my-color: #5cb100;
.shape1 {
color: @my-color;
border: 1px solid @my-color;
}
.shape2 {
background: #fff;
color: @my-color;
}
.shape3 {
border: 1px solid @my-color;
}
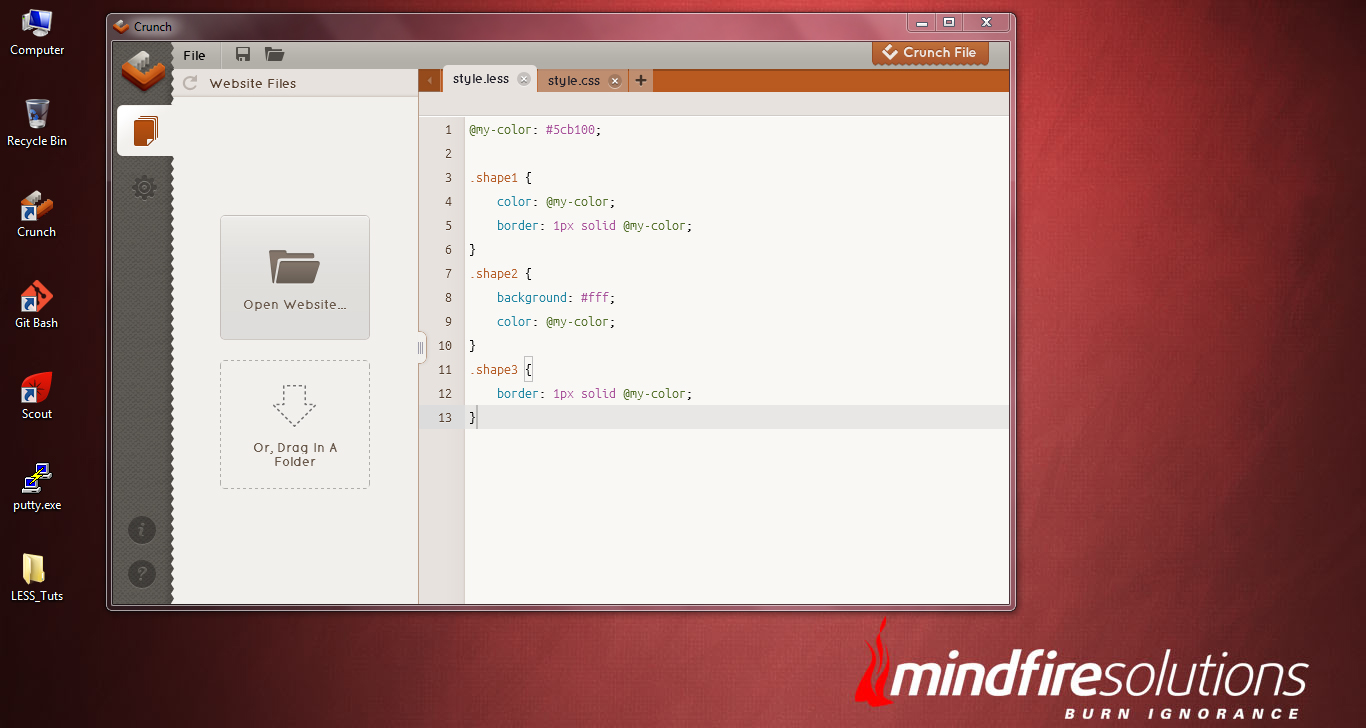
NOTE: In LESS CSS framework, variables are defined using the “@” symbol.
In the code aove, we stored the color value #5cb100 within a variable named as “my-color” and used that variable wherever we need to have that color. In this case, if suppose we need to change the color from “#5cb100” to “#250b0c”, we can easily achieve this just by replacing the color value at the top of the code by replacing the “@my-color: #250b0c”.
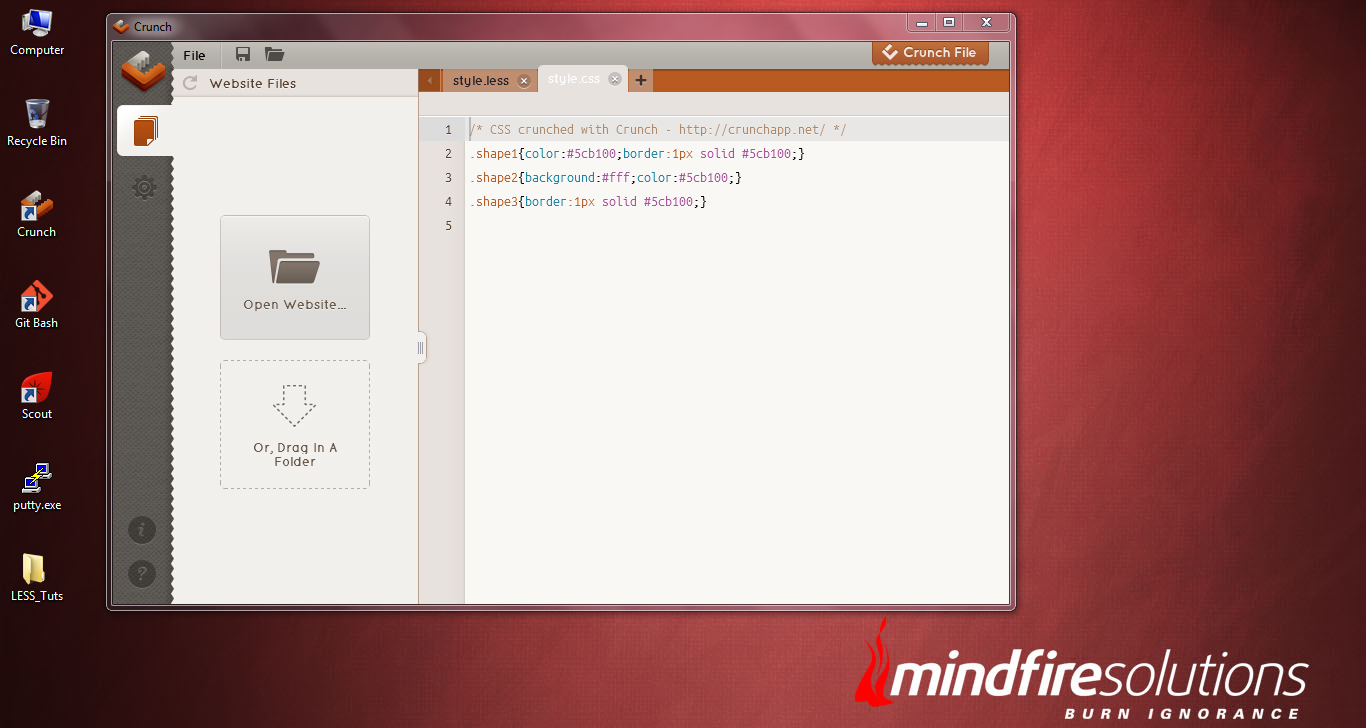
Make it a note that, every time we save our CSS code within .less file, we need to render them to .css file. To do so, click the Crunch File button at the top-right position of the Crunch compiler. This will render the style.less file into style.css file.
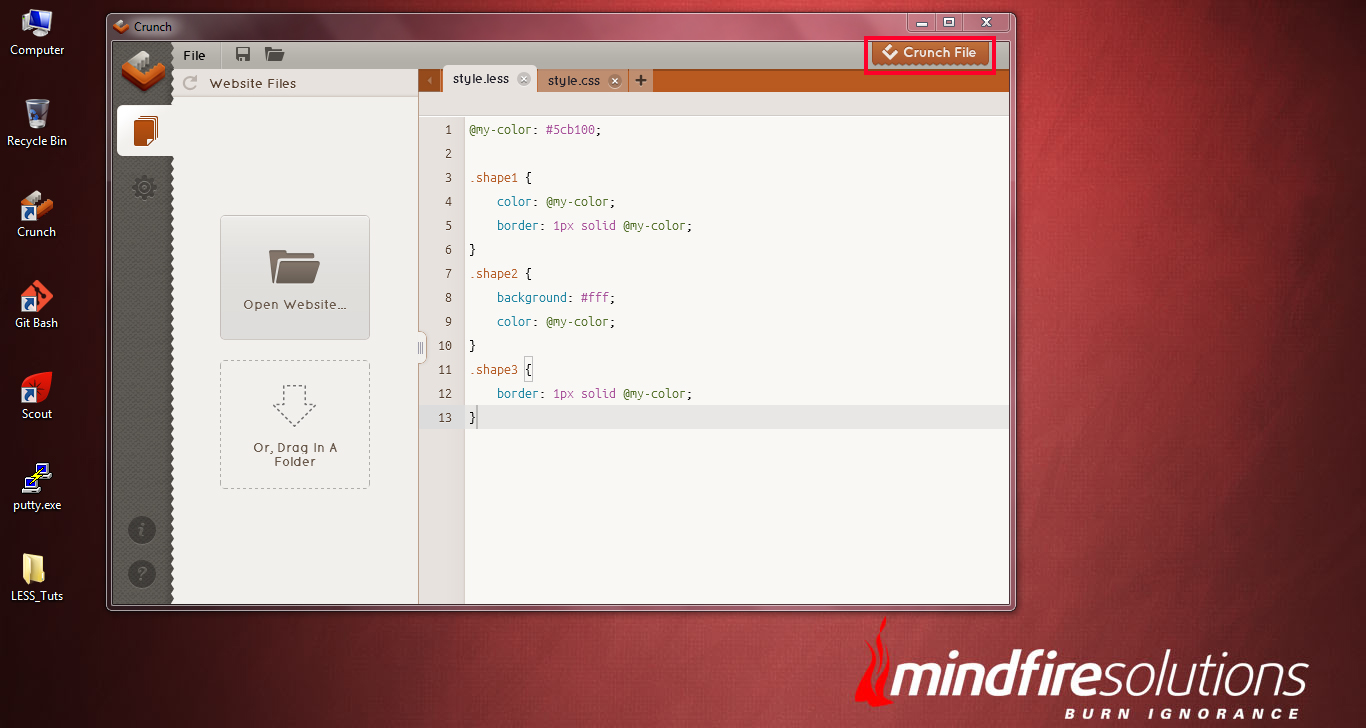
Now you can check your style.css file, how it looks. It seems to be very clean and well-commented as compared to your previously written CSS file.
MIXINS in LESS
In LESS Framework, we include a group of properties from one ruleset to another ruleset. So to define, if we have the following class:
.green-gradient {
background: #5cb100;
background: linear-gradient(top, #5cb100, #305d00);
background: -o-linear-gradient(top, #5cb100, #305d00);
background: -ms-linear-gradient(top, #5cb100, #305d00);
background: -moz-linear-gradient(top, #5cb100, #305d00);
background: -webkit-linear-gradient(top, #5cb100, #305d00);
}
As the above code defines, we have added a gradient color to a preset class “green-gradient”. Now, whenever we need to add this particular blend of gradient to any element (take for ex- a button) we just simply need to integrate the preset class “.green-gradient” in this way:
.shape1 {
.green-gradient;
border: 1px solid #ccc;
border-radius: 5px;
}
Once added and rendered the .less file, it will output to:
.shape1 {
background: #5cb100;
background: linear-gradient(top, #5cb100, #305d00);
background: -o-linear-gradient(top, #5cb100, #305d00);
background: -ms-linear-gradient(top, #5cb100, #305d00);
background: -moz-linear-gradient(top, #5cb100, #305d00);
background: -webkit-linear-gradient(top, #5cb100, #305d00);
border: 1px solid #ccc;
border-radius: 5px;
}
To use more mixins in our css3 based websites we can refer to LESS elements at LESS ELEMENTS .
What we have to do is, download the elements.less css file and keep it inside the less directory along with the style.less file.
Reference it at the top of the style.less stylesheet with:
@import “elements.less”;
Once integrated, we can reuse the classes provided from the elements.less, for example, to add a gradient colors(#F5F5F5, #EEE, #FFF) to a div with class shape1, we can write this block of code as:
.shape1 {
.gradient(#F5F5F5, #EEE, #FFF);
}
In the above code, the output will be rendered with a gradient color of Bottom-#EEE to Top- #FFF. HEre the first parameter/first color is the background color to use for browsers that don’t support gradients. The second two colors are the start and stop colors, going from bottom to top.
For further uses on LESS elements, please refer to teh documentation at LESS ELEMENTS .
Nested LESS rules
LESS CSS provides the ability to use nested css instead of or in combination with cascading. Lets implement the nesting css into the following CSS block:
#header { color: black; }
#header .navigation {
font-size: 12px;
}
#header .logo {
width: 300px;
}
#header .logo:hover {
text-decoration: none;
}
This is the traditional way of defining CSS , where we used to specify the parent of every child element while declaring any css property for them.
But if we write the same block of code using CSS , it will look somewhat like this:
#header {
color: black;
.navigation {
font-size: 12px;
}
.logo {
width: 300px;
&:hover { text-decoration: none }
}
}
The above piece of code will render the same output as the traditional method of CSS does.
Kindly notice that, we have use a “&” mark before “:hover”. It is used when there is a need for a nested selector which needs to be concatenated to its parent selector, instead of acting as a descendant. Especially it is used an an important selector mostly for pseudo-classes like :hover and :focus.
LESS CSS for Basic Operations
Basic operations like addition, subtraction, multiplication and division can also be done with the CSS file using the LESS CSS operations. WOW! Surprised. Yes, using the LESS CSS framework, now it is possible for us to do mathematical calculations and operations within the .less file which will finally rendered to required value for the elements. Any number, color or variable can assigned on CSS operations. Let’s find out how it happens:
@basic-width: 100px
.shape1 {
width: @basic-width;
}
.shape2 {
width: @basic-width * 2;
}
We the above code defines,, we have declared a value of 100px for the variable “@basic-width”, which is assigned as the width of shape1. As per our requirement, the width of the shape2 needs to be two times larger than the shape1. In our traditional CSS , we used to calculate this manually and write down the value for the width of shape2. But in LESS CSS, just simply adding “*2” with the variable “@basic-width” renders the width of shape2 two time increased in shape than shape1.
So, in this case, if anytime you want to have the width of shape1 to have increased to a different value, automatically the width of shape2 will increase depending on the width of the shape1.
Using Functions in LESS CSS
LESS framework helps in providing a variety of functions which transform in doing mathematical calculations easily. To define it with an example, we have used this method:
@width: 0.5;
.shape1 {
width: percentage(0.5);
}
The above code will render the width of shape1 to 50% of its parent element’s div. Here we have used the “percentage” function with parameter “0.5” to render the 50% width of the HTML element. !Quite straight forward.
A detailed list of LESS functions can be found at the “Functions” section of the LESS framework website.
Interpolating Strings in LESS CSS
Unlike we embed variables inside strings in other languages(like:Ruby or PHP), with the @{name} construct we can also embed variables inside strings within LESS CSS.
@url: “http://mindfiresolutions.com”;
background: url(“@{url}/images/bg.jpg”);
LESS is one of the few available CSS pre-processors. But, remember this is just the beginning into the CSS pre-processor framework. More will come along the way. I will post in a few days about the SASS and PCSS (PHP-driven CSS preprocessor).
I hope, this post has ultimately guided you in understanding the basics of using the LESS CSS framework along with the CRUNCH compiler application. If you are a web application developer and its your first time in using the LESS framework, you will find yourself to be non-techie in LESS CSS . But gradually practice makes it easier for you to go deeper into it and explore the rest of the uses of LESS framework and surely become lot easier for you.

When in Testing do as the Testers do!!!
Its high time to bridge a gap between theoretical knowledge and real world implementation.
If you are new to testing domain and just trying googling out the real meaning and approach of testing below are few points which I feel will be handy for a beginner.
– Prepare test cases or a checklist for the project you are assigned in. Include all the test scenarios you can think of. Yes you are thinking right!
P.S. All the positive and negative scenarios. 🙂
For beginners – Test a simple ’email log in’ page!
What all scenarios you guys can think of!Yes you are going on right track.. whatever weired comes to your mind..Just do not stop playing around.
P.S. Let the application crash!!! 🙂
– Start performing tests , find and report bugs but hang on always remember there’s no end to bugs i.e. you can never say ‘This application is bug free’!!
P.S. Cant help it! 🙁
– Step into Customer’s shoes ; feel like a lay man and you will be amazed to see the number of bugs you come across.
P.S. Do not end up stepping on toes! 🙁
– Be Creative in your approach ; while writing test cases or preparing a check list. Do not assume.
P.S. Assumptions is the mother of all mistakes! 😉
– Start Suggesting ; Dig into the details and get to know the product’s functionality and general behaviour. This will enable you to add value and suggest new features and enhancements to your product.
P.S. A smart move it is! 😉
Last but not the least..
– Follow Processes ; Stick to the organisation standards and guidelines and process of QA testing.
P.S. Follow the process and find as many bugs you can..after all we are a part of software QA testing team !! 🙂
Happy Testing!!! 😀
Author – Anisha Nayak

Nature of Decision Making
 Decision making is believed to be an art than a science. The reason is that very fundamental decisions are taken at the planning stages which are difficult to conceive and later implement.
One cannot lay down a structure and say this is how you can solve a problem. In fact the nature of decision, the circumstances in which these are taken and the variety of ways in which these can be implemented are so spread that we can pinpoint certain aspects to think in decision making. The endeavor of this is to build a structure around decision making so that one can understand its nature, function and implementation more clearly and help in decision making.
Some of the guidelines of decision making are listed below: Continue reading Nature of Decision Making

18 things to keep in mind while testing any application
In the world of software QA testing, mastering the best practices is the key to success. This article presents 18 essential tips for QA professionals. From thorough test result analysis to maximum coverage and negative scenario testing, it covers a range of critical aspects. It emphasizes the importance of dividing applications into modules, early test case preparation, and involving testers from the start. The significance of regression testing, performance testing, and thinking beyond requirements is highlighted. Effective communication, prioritization, and continual learning round out the best practices, ensuring QA testers excel in their field and deliver high-quality software products.
Software Testing Best Practices: A Comprehensive Checklist
1) Thorough Analysis of the Test Results:
As a software QA testing professional, it is crucial to go beyond reporting bugs and provide a comprehensive analysis of the test results. Error logs can reveal valuable insights into the nature and root causes of defects. By including this analysis in the bug report, testers make it easier for developers to understand and address the underlying issues. This expedites the bug-fixing process and fosters effective collaboration between testers and developers, leading to improved software quality.
2) Attain Maximum Coverage:
While achieving 100% test coverage may be impractical, testers should strive to cover as many combinations and scenarios as possible. By employing a systematic and strategic approach, testers can maximize test coverage. This involves identifying key functionalities, critical paths, and representative data sets to ensure that the most critical aspects of the software are thoroughly tested. Additionally, testers can leverage techniques such as equivalence partitioning and boundary value analysis to optimize coverage and prioritize test cases.
3) Divide and Conquer:
To achieve maximum test coverage, it is beneficial to divide the application into smaller modules and write separate test cases for each module. This approach facilitates focused and detailed testing of individual components, ensuring comprehensive coverage across the entire system. By breaking down the testing effort into manageable units, testers can effectively address complexities, identify defects, and maintain a high level of quality throughout the software development lifecycle.
4) Emphasize Negative Scenarios:
In addition to testing positive scenarios, it is crucial to include test cases for negative scenarios or invalid conditions. This ensures that the software behaves correctly when exposed to unexpected inputs or error-prone situations. By deliberately testing edge cases, boundary conditions, and invalid inputs, testers can validate the system’s robustness, error-handling capabilities, and adherence to specifications. Thorough negative testing helps uncover vulnerabilities and ensures that the software remains stable, secure, and user-friendly in all scenarios.
5) The Right Mindset
Approach QA testing with the mindset of discovering defects and identifying areas for improvement. Instead of assuming the software is defect-free, maintain a critical perspective and actively seek out potential bugs. This mindset encourages a thorough examination of the software and motivates testers to conduct comprehensive tests, resulting in higher-quality products. A vigilant and inquisitive approach to testing helps uncover issues that may have otherwise gone unnoticed, promoting a culture of continuous improvement and defect prevention.
6) Early Test Cases preparation :
To optimize the testing process, it is beneficial to start test case preparation during the analysis and design phase. Involving testers early on enables a better understanding of the requirements and facilitates the creation of comprehensive test cases. By actively participating in requirements discussions, testers can gain insights into the system’s intended functionality, identify potential test scenarios, and ensure that test cases align with the expected outcomes. Early test case preparation contributes to improved test coverage and enhances the overall effectiveness of the testing effort.
7) Ready with Test Cases before the completion of development :
Rather than waiting for the completion of development, testers should aim to have test cases ready in advance. Providing developers with test cases during the development process allows them to analyze and validate their work against the expected outcomes. This proactive approach enables early defect detection, smoother collaboration between testers and developers, and reduces rework efforts. It also enhances the overall development process by ensuring that quality considerations are integrated from the outset.
8) Address “Regression” effectively:
Regression testing plays a critical role in ensuring that modifications or enhancements to the software do not introduce new defects or cause regressions in existing functionality. By including regression test steps within test cases, testers can perform quick regression checks during system testing itself. This approach saves time and effort by identifying and addressing regression issues early on, minimizing the risk of functional regression and maintaining the stability of the software.
9) Test the “Performance”:
Thorough performance testing is essential for applications where response time is crucial. Testers should design and execute performance tests to assess the application’s behavior under various load conditions, stress scenarios, and unfavorable environments. By simulating realistic workloads and analyzing performance metrics, such as response times, resource utilization, and scalability, testers can identify performance bottlenecks, optimize system performance, and ensure a seamless user experience.
Another critical aspect to consider is how the application manages data during peak usage. Database performance testing ensures that queries run efficiently, data retrieval is optimized, and the system remains responsive even under high load, supporting overall application stability and speed.
10) Leave full spectrum Testing to QA:
To maintain objectivity and ensure a fresh perspective, it is generally advisable for testers not to test the code they have developed themselves. When individuals test their own code, there is a higher likelihood of overlooking mistakes or biases due to familiarity. Instead, encourage collaboration among developers and testers, enabling independent verification and validation of the software. This approach promotes rigorous testing and helps identify defects that may have been overlooked by the developer.
11) Think beyond Requirements:
While testing based on specified requirements is essential, testers should also explore scenarios that may not be explicitly mentioned in the documentation. By thinking creatively and applying domain knowledge, testers can identify potential risks, edge cases, and scenarios that may not have been considered during requirements gathering. This broader approach to testing helps uncover hidden defects, enhances software robustness, and contributes to a more comprehensive testing strategy.
12) Leverage Past Experiences and Data:
Learning from past experiences is invaluable in software QA testing. Testers can refer to historical data, statistics, graphs, and previous test results to identify defect-prone areas, determine common patterns, and allocate testing efforts accordingly. By leveraging this knowledge, testers can focus on critical areas, allocate resources effectively, and adapt their testing approach based on past trends and insights. This data-driven approach enhances the efficiency and effectiveness of the testing process.
13) Continuous Learning:
The field of software QA testing is continuously evolving, and testers should actively seek opportunities for learning and skill development. Throughout the testing process, testers encounter new terms, concepts, and technologies. Keeping a record of these learnings and documenting them in a personal knowledge base helps build a repository of valuable insights. These learnings can contribute to the preparation of test closure reports, facilitate knowledge sharing, and ensure continuous improvement in testing practices.
14) Early Involvement of the Testing team:
To achieve optimal results, it is advisable to involve testers from the early stages of the software development lifecycle. Engaging testers during requirements analysis and design phases allows them to gain a deep understanding of the application’s functional and non-functional aspects. This early involvement facilitates proactive test planning, identification of potential testing challenges, and the formulation of effective testing strategies. By participating in requirements discussions and design reviews, testers can contribute their expertise and ensure the development process is aligned with quality goals.
15) Share Best Practices:
To foster a culture of excellence and continuous improvement, testers should share their best practices with other QA testing professionals. By sharing insights, techniques, and lessons learned, testers can contribute to the growth and development of the testing community. This exchange of knowledge promotes collaboration, inspires innovation, and ensures that industry-wide best practices are shared and implemented consistently.
16) Effective Communication and Collaboration:
Testers should actively engage in discussions and maintain effective communication with developers, business analysts, and other stakeholders. Direct interaction helps clarify requirements, resolve conflicts, and ensure that everyone is on the same page regarding the expected behavior of the software. When conflicts or misunderstandings arise, timely face-to-face discussions or written communications (such as emails) should be used to address and resolve them. Effective communication fosters collaboration, reduces misunderstandings, and ensures a shared understanding of quality objectives.
17) Prioritization and Risk Management:
To optimize testing efforts, testers should prioritize their work based on risk analysis and project constraints. By identifying critical functionalities, high-risk areas, and potential showstoppers, testers can allocate their resources effectively. Prioritization ensures that testing efforts are focused on the most critical areas, reduces the risk of major defects slipping through, and facilitates risk-based decision-making throughout the project lifecycle..
18) Effective Bug Reporting:
Writing clear, concise, and detailed bug reports is crucial for effective communication between testers and developers. A well-crafted bug report includes not only the symptoms and steps to reproduce the bug but also provides the impact of the bug on the application. Testers should analyze the bug, include possible causes, and provide any additional information that aids in reproducing and fixing the issue. Well-documented bug reports expedite the debugging process, enable efficient collaboration between testers and developers, and ensure that issues are resolved accurately and promptly.
By implementing this software testing best practices checklist, QA and testing professionals can enhance their effectiveness, improve the overall quality of the software, and contribute to the success of projects.
Looking to ensure your product performs flawlessly before launch? Mindfire’s QA and Testing Services help businesses identify bugs early, enhance performance, and deliver seamless user experiences through customized, agile-driven testing solutions.